
Nature Brushes for Kids: Easy Outdoor Art Activity

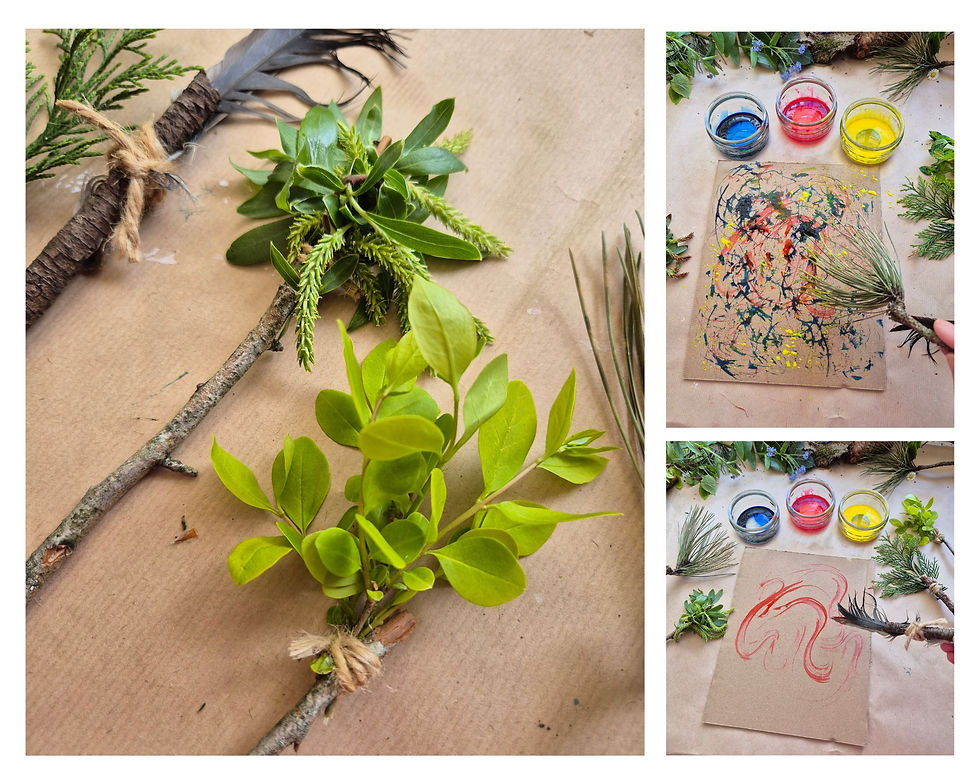
Are you looking for an easy outdoor art activity for kids? Making nature brushes is a fun, low-cost way to use sticks, leaves, feathers, grasses and other natural materials to create your own paintbrushes from nature.
This is a brilliant summer craft for kids because it gets them outside collecting natural materials, then brings them back to the table to explore mark-making, texture, pattern, movement and painting.
This nature brush painting activity would also work beautifully for World Earth Day, outdoor learning, summer crafts, nature art or recycled craft projects.
Why make nature brushes with children?
Nature brushes are a lovely way for children to slow down and notice the textures around them.
Instead of using a normal paintbrush, children can explore what happens when they paint with feathers, leaves, pine, conifer, grasses or other natural objects.
Each brush will create different marks. Some might make scratchy lines. Some might make soft sweeping marks. Some might dab, drag, flick or splatter the paint.
It is a great process-over-product art activity because the focus is not on making a perfect picture. It is about exploring materials, experimenting with texture and seeing what marks nature can make.
You will need
Sticks
Natural materials such as feathers, leaves, grasses, pine, conifer, privet or willow
String, twine or wool
Scissors
Paint or ink
Cardboard or paper
A paint tray, plate or palette

Step 1: Collect your sticks
Start by collecting some small sticks. These will become the handles for your nature paintbrushes.
Try to choose sticks that are around 10–15 cm long. You do not want them too long because this is the part children will hold.
You can collect a few different sticks so you can make several nature brushes and test the different marks they create.
Step 2: Go on a nature scavenger hunt
Next, go on a little nature scavenger hunt around your garden, playground, park or outdoor space.
Look for natural materials that might create interesting textures when dipped into paint. You want things that can be tied onto the end of your stick and used like a paintbrush.
For my nature brushes, I used:
feathers
conifer
privet
willow
pine
They all created completely different marks and textures, which is the best part of this activity.
Try to choose a mix of soft, spiky, fluffy, bendy and leafy materials so children can explore lots of different effects when they start painting.
Safety note: collect carefully
Make sure children are supervised when collecting natural materials.
Only pick things that are safe to handle and that you recognise. Avoid unknown plants, berries, mushrooms or anything sharp, prickly or irritating to the skin.
Where possible, collect fallen leaves, feathers, twigs and natural objects rather than pulling from living plants. This is a lovely chance to talk to children about respecting nature and looking after outdoor spaces.
Also remind children not to put any plants, leaves, feathers or fingers in their mouths during the activity.
Step 3: Attach your natural materials
Once you have collected your sticks and natural materials, choose what you would like to use for each brush.
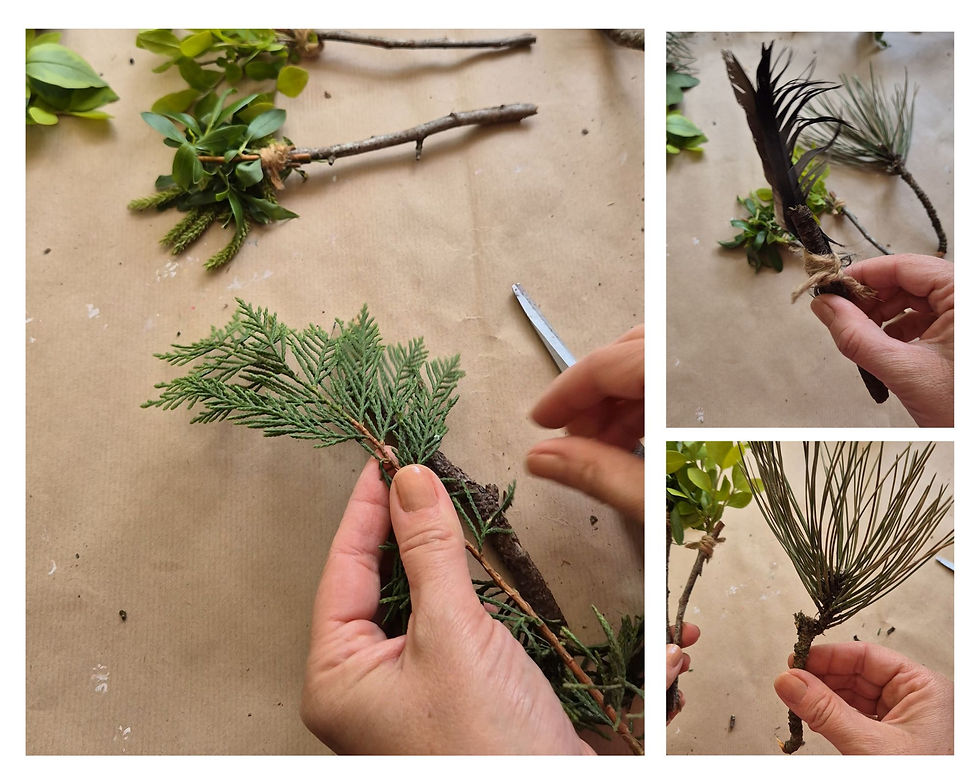
Place your feather, leaves, pine, conifer, willow or other natural material at one end of the stick. This will become the brush end.
Use string, twine or wool to wrap the natural material onto the stick.
You do not need much. Just wrap it around a few times, pull it tight, and tie a big knot so it feels secure.
It does not need to look neat or pretty. The important thing is that the natural material stays in one place when children start painting.
You can make a few different nature brushes using different textures, then compare the marks they make.

Step 4: Set up your painting surface
Once your nature brushes are tied together, you are ready to start painting.
It is nice to have a little selection of different nature brushes so children can explore lots of different textures, shapes and movements on the page.
For this activity, I used cardboard instead of paper. Nothing fancy — just an old parcel box cut up to make a simple recycled canvas.
This makes it a really low-cost art activity, and it links nicely to recycled crafts and outdoor nature play.
Step 5: Choose your paint or ink
For this nature brush painting activity, I used ink.
You could use black ink, coloured ink, watered-down poster paint, acrylic paint or whatever paint you already have at home or in school.
If you are using poster paint, you might want to water it down slightly. This can help the paint move more easily across the cardboard and lets children explore more flowing marks and movement.
I used the primary colours — red, blue and yellow — because it adds a lovely colour theory element to the activity.
Children can explore what happens when the colours overlap, mix and layer together on the cardboard.

Step 6: Start making marks
Dip your nature brush into the paint or ink and start moving it across the cardboard.
Try:
dragging
dabbing
sweeping
tapping
twisting
layering colours
Each natural material will create a different effect.
As I moved my nature brushes across the cardboard, they created beautiful shapes, lines, patterns and curves. The feathers made different marks to the pine, and the leafy brushes created their own textures too.
Because I used red, blue and yellow ink, the colours started to mix and overlap as I painted. I began to see greens, oranges and lots of lovely tones appearing across the picture.
This is a great way to add a simple colour theory element to the activity. Children can explore primary colours, colour mixing and layering while experimenting with natural textures and mark-making.
Step 7: Keep painting and exploring
Once you start painting, keep experimenting with your nature brushes.
Try using one brush at a time, or layer different marks on top of each other.
You can keep your nature brushes afterwards too. If you are careful, you might be able to rinse them out and use them again. Or you could simply let the paint dry on them and start building a little collection of homemade nature brushes.
This is such a fun, simple and easy way to create something completely unique. Even if you use the same natural materials again, you will never get exactly the same patterns or marks.

World Earth Day activity idea
This nature brush activity would be a lovely creative project for World Earth Day.
Children can collect natural materials, explore the textures found in plants and trees, and use recycled cardboard as their canvas. It is a simple way to talk about reusing materials, noticing nature and creating art from the world around us.
You could also use it as a starting point for conversations about looking after outdoor spaces, respecting plants and only collecting natural items that are safe and already fallen where possible.
A simple nature art activity
Nature brushes are a beautiful way for children to connect with nature, slow down and notice all the different textures found in plants, trees and natural objects around them.
They are easy to make, low-cost and perfect for outdoor learning, summer crafts, World Earth Day, nature art, recycled crafts and creative play.
This activity is not about creating a perfect picture. It is about exploring, experimenting and seeing what marks nature can make.

Happy creating
I hope you enjoy making your own nature brushes.
Collect a few sticks, find some interesting textures, tie them together and see what beautiful marks you can create.
Happy creating.
Love,
Kerry xxx

Comments