Bubble Wrap Honeycomb Bee Craft for World Bee Day
- Kerry

- May 31
- 3 min read
Looking for an easy bee craft for World Bee Day?
This bubble wrap honeycomb bee craft is a fun, low-cost art activity for children using cardboard, bubble wrap, paint and fingerprints.
Children can print their own honeycomb background, add fingerprint bees, and learn why bees are so important for nature and pollination.
This is a lovely process-over-product activity because every print will look different. It does not need to be perfect. It is all about exploring pattern, printing, colour mixing and mark-making.
Why make a bee craft for World Bee Day?
World Bee Day is a brilliant opportunity to talk to children about bees and why they matter.
Bees help pollinate flowers, fruits and vegetables, which means they play a huge part in helping plants grow. They are tiny, busy and incredibly important for our gardens, wildlife and food.
This craft is a simple way to start those conversations. Children can make honeycomb patterns, create their own little fingerprint bees and think about where bees live, how they move and why we need to look after them.

You will need
Cardboard
Bubble wrap
Scissors
Glue stick, such as Pritt Stick
A4 paper or any paper you have
Yellow paint
Brown paint
Paint plate or tray
Black pen or marker
How to make your bubble wrap honeycomb bee picture
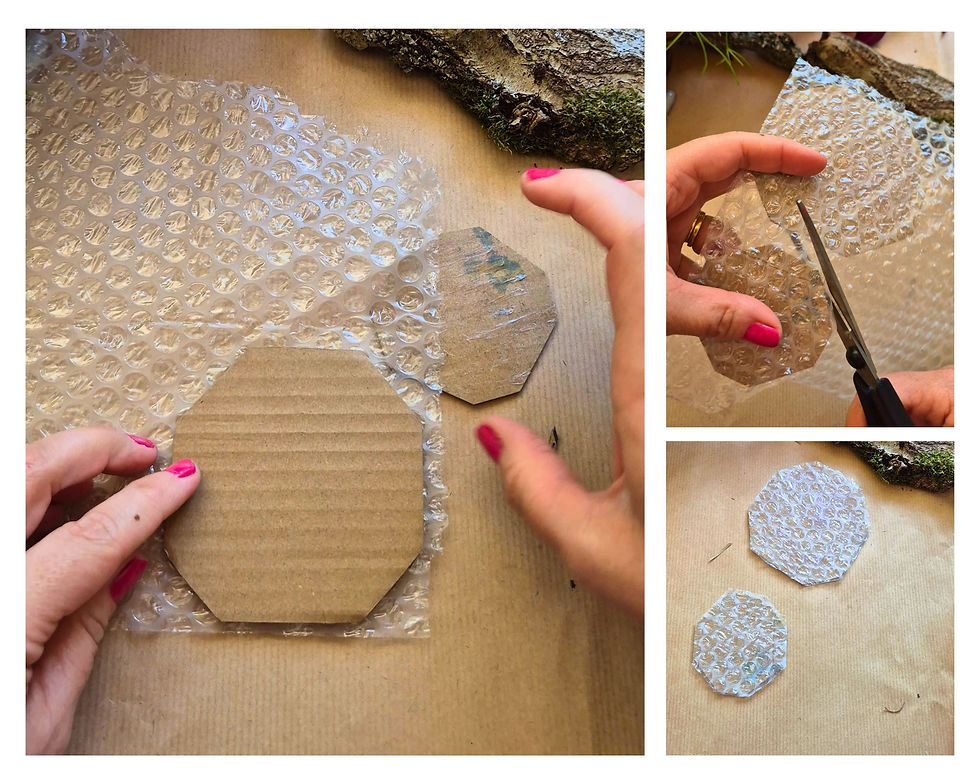
Step 1: Cut out your cardboard shapes
Start by cutting two hexagon shapes from cardboard.
You will need one small hexagon and one larger hexagon. These will become your honeycomb stamps.
They do not need to be perfect. A rough hexagon shape is absolutely fine.
Step 2: Add the bubble wrap
Cut pieces of bubble wrap to fit over one side of each cardboard hexagon.
Glue the bubble wrap onto the cardboard using a glue stick. Make sure the bubble side is facing up, not stuck down.
The bumpy side is what will create your honeycomb print.
Once the glue has stuck, snip around the edges so the bubble wrap matches the cardboard shape. Now you have your honeycomb stamps.
Step 3: Mix your honeycomb colours
On a plate or paint tray, mix together some yellow/ orange and brown paint.
You can keep the colours a little bit separate so the prints have different tones, or mix them together to create a golden honey colour.
This is a great chance for children to explore colour mixing and texture.
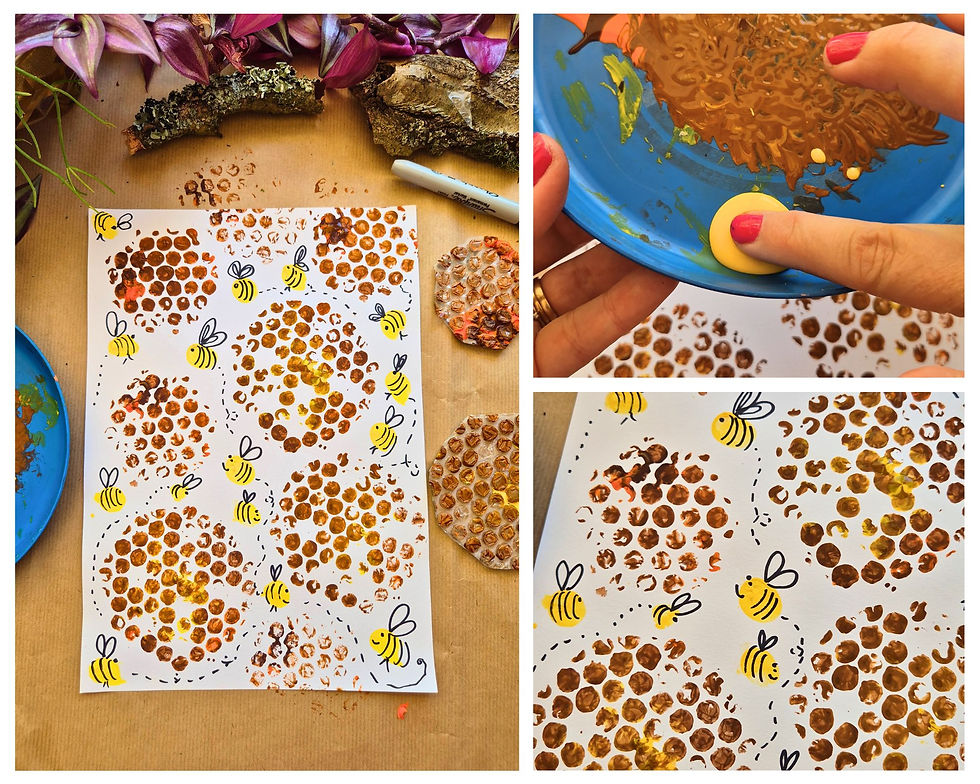
Step 4: Print your honeycomb background
Dip your bubble wrap hexagon stamps into the paint.
Press them onto your paper to create honeycomb prints. Use a mix of the big and small hexagons across the page.
You can overlap them, spread them out, print them in clusters, or cover the whole page.
This will become the background for your bee picture.

Step 5: Add yellow fingerprints
Dip a finger into yellow paint and add fingerprints around the page.
These yellow fingerprints will become your bees.
You can add lots of bees or just a few. Let children decide where their bees are flying.
Leave the paint to dry before adding the pen details.

Step 6: Turn your fingerprints into bees
Once the paint is dry, use a black pen or marker to turn each yellow fingerprint into a bee.
Add black stripes, little wings, tiny faces, legs if you want to, dotted flight trails and a few buzzing “zzzz” marks behind the bees.
This is the part where the picture really comes to life.

A cute buzzing bee picture
And there you have it — one cute buzzing bee picture, made with bubble wrap printing, fingerprints and simple mark-making.
This is a lovely World Bee Day activity for home, nursery, school or the kitchen table. It is simple enough for younger children, but older children can add more detail, pattern and creative touches.
You could also use this activity as a starting point for talking about bees, honeycomb, habitats, pollination and why we need to protect our tiny garden helpers.

Easy ways to adapt this activity
For younger children, you can cut the cardboard and bubble wrap shapes for them, then let them enjoy the printing and fingerprint bees.
For older children, they could cut their own hexagons, create repeating patterns, design a full beehive scene or add facts about bees around the edge of the page.
You could also try this with different paper sizes, recycled cardboard, coloured backgrounds or even turn the finished picture into a World Bee Day poster.
Happy creating
I hope you enjoy making this bubble wrap honeycomb bee craft.
It is simple, low-cost and full of lovely little learning moments, printing, colour mixing, pattern, nature, bees and imagination.
Happy creating.
Love,
Kerry xxx

Comments