
DIY Flower Press for Kids: Easy Summer Nature Craft
- Kerry

- Jun 1
- 5 min read
Looking for an easy summer nature craft for kids? This DIY flower press is a lovely way to collect, press and preserve flowers from the garden.

Making a simple flower press is a brilliant activity for children who love nature, flowers and outdoor exploring. It is low-cost, easy to make and uses simple materials you probably already have at home, such as cardboard, kitchen roll and hair bands.
Once the flowers are pressed and dried, children can use them for cards, bookmarks, nature journals, collages, keepsakes or seasonal craft projects.

Why make a flower press with children?
A homemade flower press is a lovely way to help children slow down and notice the small details in nature.
They can look closely at petals, leaves, colours, shapes and patterns, then preserve their favourite flowers to use in future craft projects.
It also teaches patience. This is not an instant craft. Children have to wait a few weeks for the flowers to press and dry, then decide what they would like to make with them afterwards.
Once the flowers are dried, children also have to handle them gently because pressed flowers are delicate. This makes it a lovely activity for practising care, patience and careful hands.
This is a perfect summer craft for kids, garden activity, nature walk project or outdoor art activity. It also links beautifully to seasons, plants, flowers, observation skills and creative learning.
You will need
Cardboard
Kitchen roll
Flowers
Leaves, optional
Pen for decorating
Scissors
Hair bands, elastic bands or string
Step 1: Cut your cardboard sheets
Start by cutting several sheets of cardboard into squares.
Mine were around 10 cm x 10 cm, but you can make yours bigger if you want a larger flower press.
I made around 10 sheets of cardboard. You do not need to be exact, but having several layers means you can press more flowers at the same time.

Step 2: Decorate the front cover
Choose one piece of cardboard to be the front cover of your flower press.
Decorate it however you like. I used a pen to draw a flower on the front.
I would recommend using something dry, like a pen, pencil or coloured pencil, rather than paint. You do not want the cardboard to get wet before you start pressing your flowers.
Children could write their name, draw flowers, add patterns, or decorate the cover with simple nature-inspired doodles.
Step 3: Prepare your kitchen roll layers
Next, fold sheets of kitchen roll into quarters.
You will need one folded piece of kitchen roll for each layer of your flower press.
The kitchen roll helps absorb moisture from the flowers as they press and dry.
Put your folded kitchen roll pieces to one side ready for building your flower press.

Step 4: Pick your flowers
Now choose some flowers to press.
I used pansies because I know they press really nicely. Violas are also beautiful, and flowers with bright colours often work well too.
Look for flowers that are fairly flat and not too thick. Smaller, thinner flowers usually press better than large, bulky ones.
You could also try small leaves, delicate petals or little garden flowers.
Safety note: know what you are picking
Make sure you know what flowers and leaves you are picking before using them in your flower press. Some garden and hedgerow plants can be poisonous, such as foxgloves, so children should be supervised and only use flowers and leaves that an adult knows are safe to handle.
Avoid picking unknown plants from hedgerows, parks or wild spaces unless you are completely sure what they are. When in doubt, leave it out.
Also remind children not to put flowers, leaves or fingers in their mouths during the activity. This is a hands-on nature craft, but nothing should be eaten.
Step 5: Start layering your flower press
Place your bottom sheet of cardboard down first.
Add one folded piece of kitchen roll on top.
Place your flowers in the middle of the folded kitchen roll. Then fold the kitchen roll over the flowers so they are sandwiched inside.
Place another piece of cardboard on top.
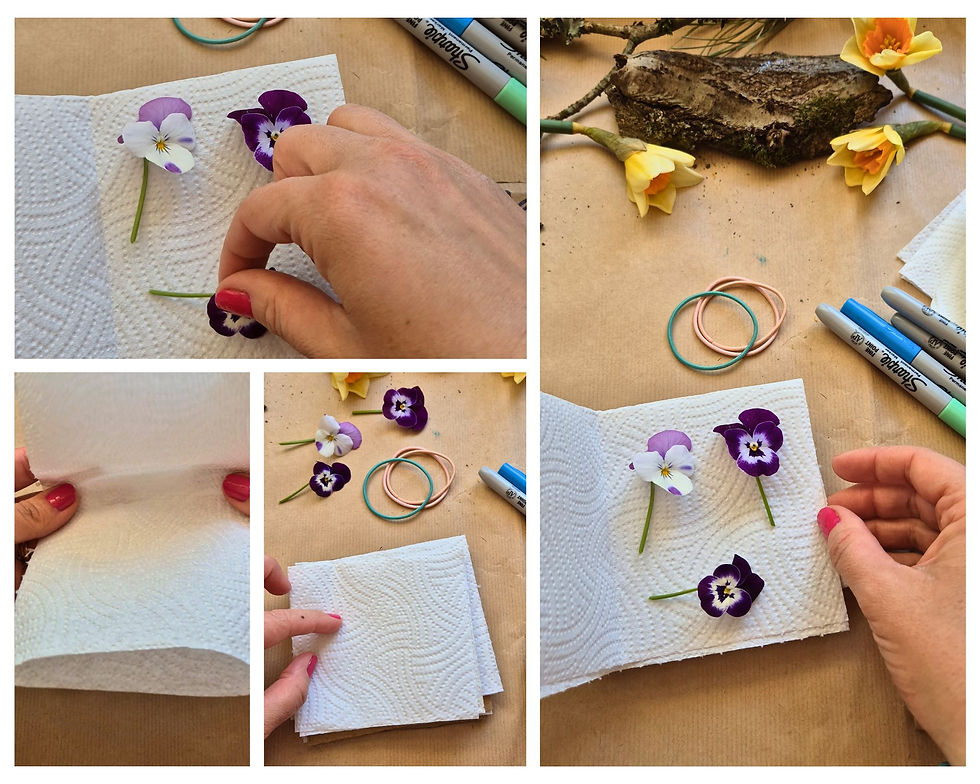
Step 6: Keep adding layers
Repeat the same process:
cardboard, folded kitchen roll, flowers, kitchen roll folded over, cardboard.
Keep layering until your flower press is filled with the flowers you want to press.
Try not to overcrowd each layer. Leave a little space between the flowers so they press neatly and do not overlap too much.

Step 7: Secure your flower press
Once you are happy with your layers, secure the flower press tightly.
I used hair bands to keep mine together. I used two going across horizontally and one going vertically, so the flower press was held firmly from all directions.
You could also use elastic bands, string or anything you can wrap tightly around the press.
The aim is to keep the cardboard layers compact so the flowers are pressed flat while they dry.
Step 8: Leave your flowers to press
Put your flower press somewhere dry and safe.
Leave it for a few weeks so the flowers have time to dry and flatten properly.
Try not to open it too soon, even though it is tempting. This is part of the process. Waiting gives the flowers time to press properly and helps children learn that some creative projects take time.
Step 9: Open your flower press
After a few weeks, carefully open your flower press and gently peel back the kitchen roll.
Pressed flowers can be very delicate once they are dried, so take your time. Use careful hands and try not to pull or rush.
This is such a lovely moment because children get to see what has happened while they have been waiting.
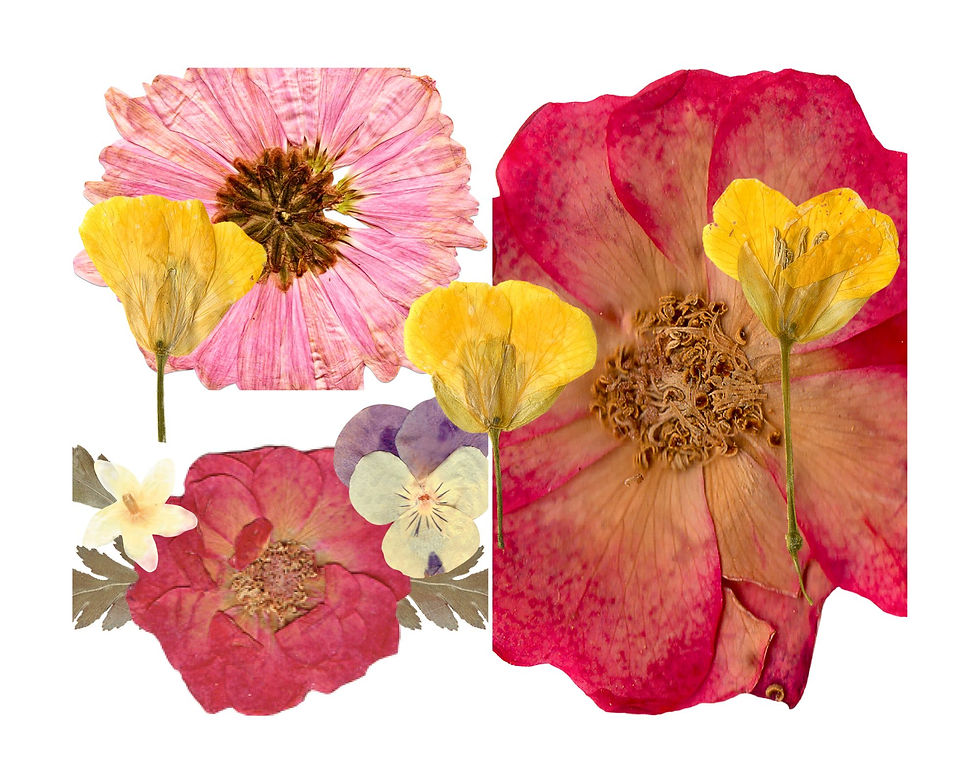
What can you make with pressed flowers?
Once your flowers are dry, you can use them in lots of creative projects.
You could make:
pressed flower cards
bookmarks
nature journals
collages
gift tags
framed flower art
seasonal keepsakes
homemade decorations
Pressed flowers are delicate, so handle them carefully when you take them out of the flower press.

A simple summer nature craft
This DIY flower press for kids is such a lovely way to collect and preserve little pieces of summer.
It is simple, low-cost and easy to make using cardboard, kitchen roll and flowers. It also gives children a reason to explore the garden, notice colours and shapes, and create something they can use again in future craft projects.
It is a perfect summer craft for kids, nature craft, garden activity or outdoor learning project for home or school.
Happy creating
I hope you enjoy making your own DIY flower press.
Collect a few safe flowers, layer them carefully, wrap your flower press tightly and wait to see what beautiful pressed flowers you create.
Happy creating.
Love,
Kerry xxx

Comments