
Flower Hammering Art for Kids: Easy Summer Nature Craft
- Kerry

- May 31
- 6 min read

Looking for an easy summer nature craft for kids?
This flower hammering art activity is a beautiful way to use flowers, leaves and simple materials to create a natural fabric print.
Flower hammering, sometimes called flower pounding or nature printing, is a lovely process art activity for children. It uses the natural colours from flowers and leaves to create prints on cotton fabric. It is simple, low-cost, hands-on and full of surprise because every flower and leaf prints differently.
This is a perfect outdoor art activity for summer, garden crafting, nature walks, forest school, home learning or a creative afternoon at the kitchen table.
Why try flower hammering with children?
Flower hammering is a brilliant way for children to explore nature, colour, pattern and texture. It encourages them to slow down, look closely at flowers and leaves, and notice the shapes and colours found in the natural world.
It is also a lovely process-over-product craft. The finished print does not need to be perfect. Some flowers will print brightly, some will leave soft marks, and some colours may completely change as they transfer onto the fabric.
That is part of the magic.
Children can experiment, make discoveries and enjoy the surprise of seeing what nature creates.
You will need
A piece of cardboard, a wood slice or something strong to protect your table
White cotton fabric
Two pieces of fabric, ideally the same size
Fresh flowers
Fresh leaves
A wooden mallet, rubber mallet or large smooth pebble
A stick, slightly wider than your fabric
Twine
Glue or a glue gun
Scissors
For my example, my fabric was around 14 cm x 16 cm, and my stick was around 20 cm long.

Best flowers and leaves for flower hammering
Thin, flat flowers and leaves work best for flower hammering.
Try using:
pansies
violas
salvias
strawberry leaves
delicate petals
small flat leaves
herbs
thin garden flowers
Avoid flowers that are very thick, watery or juicy, as they can squash into a mush rather than leaving a clear flower print.
You can also remove petals from flowers and use them separately. This often gives a clearer print and helps children arrange their design more easily.
Safety note: know what you are picking
Make sure you know what flowers and leaves you are picking before using them for flower hammering. Some garden and hedgerow plants can be poisonous, such as foxgloves, so it is important that children are supervised and only use flowers and leaves that an adult knows are safe to handle.
Avoid picking unknown plants from hedgerows, parks or wild spaces unless you are completely sure what they are. When in doubt, leave it out.
Children must be supervised during this activity. They will be hammering, so make sure they keep their fingers away from where they are tapping and use gentle, controlled movements. Adult help may be needed, especially for younger children.
Also remind children not to put any flowers, leaves or fingers in their mouths during the activity. This is a hands-on nature craft, but nothing should be eaten.
For children, I would stick to safe, familiar flowers and leaves from your own garden, or flowers you know well.

How to make flower hammering art
Step 1: Protect your table
Start by placing a piece of cardboard, a wood slice or another protective surface on your table.
You will be hammering, so make sure the surface underneath is protected.
Step 2: Lay down your fabric
Place one piece of white cotton fabric on top of your cardboard or wood slice.
This will be the fabric that catches the flower and leaf prints.
Cotton works really well because it absorbs the natural colour from the flowers and leaves.

Step 3: Arrange your flowers and leaves
Now arrange your flowers and leaves on top of the fabric.
Think about your design before you start hammering. You could make a pattern, create a border, scatter the petals naturally, or arrange them in a little garden-inspired design.
Remove any thick stalks or bulky parts from the flowers and leaves. You only want the thinner parts that will print well.
You can use whole small flowers, individual petals or leaves. Thin flowers work best because they flatten easily and release their colour into the cotton.

Step 4: Add your second piece of fabric
Carefully place your second piece of fabric over the top of your flowers and leaves.
Try to line it up with the fabric underneath if they are the same size.
The lovely thing about using two pieces of fabric is that you can get a double print. The flowers and leaves can transfer onto both pieces, so you end up with two nature prints.

Step 5: Start hammering
Now it is time to start hammering.
Using a wooden mallet, rubber mallet or large smooth pebble, gently tap all over the top piece of fabric.
You do not need to hit too hard. Little taps all over the fabric work best.
As you hammer, you will start to see the flowers and leaves bleed through into the cotton. This is where the magic happens.
Some flowers might change colour as they transfer. A pink flower might leave a blue mark. A leaf might turn brown. A petal might create a bright pop of colour you were not expecting.
Every flower hammering print is a surprise.
Keep hammering across the whole piece of fabric until you can feel that the flowers and leaves underneath have flattened. You want the petals and leaves to be squashed into the cotton so their natural colour transfers onto the fabric.
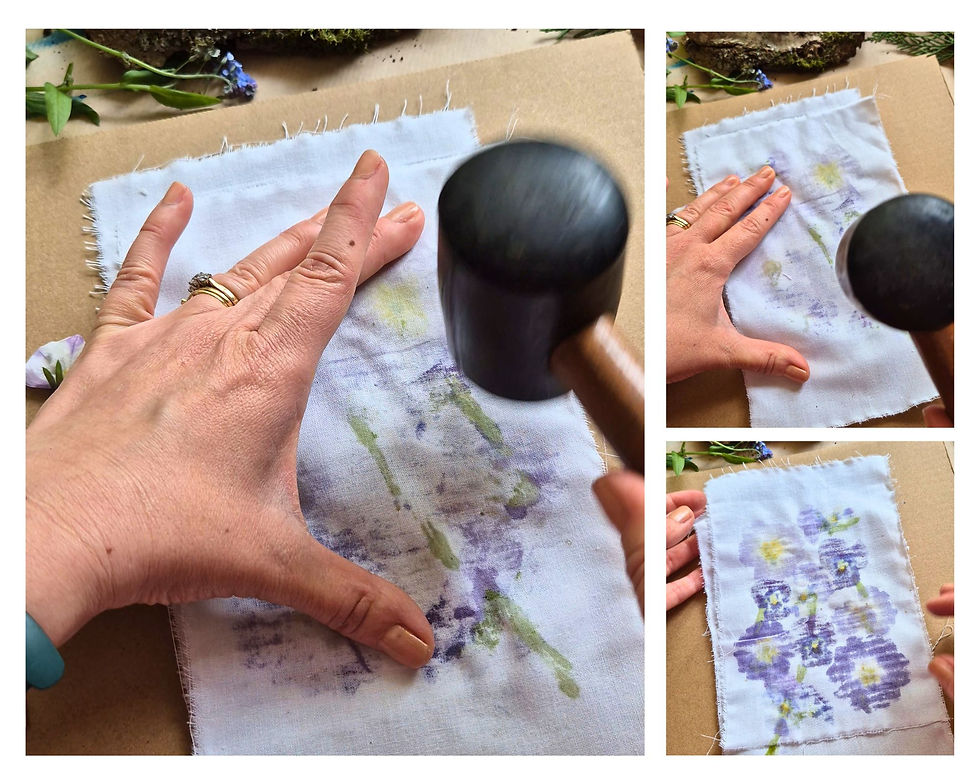
Step 6: Reveal your flower print
Once you have finished hammering, carefully peel back the top piece of cotton fabric.
Some of the flowers and leaves may stick to the fabric, so gently peel those away too.
Take your time with this part so you do not smudge the print too much.
You should now be able to see the natural colours and shapes that have transferred into the cotton.
This is the exciting part because every print will look different. Some colours will be strong, some will be soft, and some flowers may leave a completely unexpected shade.

Step 7: Choose your favourite print
Because you have used two pieces of fabric, you should have two flower hammering prints.
Choose the one you like best. Sometimes one print will come out stronger than the other, depending on how the flowers and leaves were placed and how much colour transferred.
You can keep the second print for another little project, card, collage, bookmark or nature journal.
Step 8: Attach your fabric to a stick
To turn your flower hammered fabric into a little wall hanging, place your favourite print face down on your cardboard or wood slice.
The back of the fabric should be facing up.
Lay your stick across the top edge of the fabric. Your stick needs to be slightly wider than your fabric.
Using a glue gun or strong glue, attach the stick along the top of the fabric. Then fold the top edge of the fabric over the stick and glue it down.
This creates a little sleeve around the stick and hides the raw edge of the fabric.
Turn your fabric back over so the flower print is facing up.

Step 9: Add twine for hanging
Cut a piece of twine long enough to make a hanging loop.
Tie one end of the twine to one side of the stick. Then tie the other end to the other side.
Now your flower hammering wall hanging is ready to display.
Tips for flower hammering
Use thin, flat flowers and leaves for the best prints.
Avoid flowers that are very wet, thick or juicy, as they can squash into a mush rather than creating a clear print
.
Do not wash your finished fabric, as the natural colours may fade or disappear.
Try not to hang your flower hammering art in direct sunlight, as the colours can fade over time.
Remember, this activity is all about experimenting. The colours can change, the prints can surprise you, and no two pieces will ever look the same.
Easy ways to adapt this activity
For younger children, you can arrange the flowers and leaves for them and let them enjoy the hammering part with close supervision.
For older children, they can design their own arrangement, experiment with different flowers and compare which plants create the strongest prints.
You could also try flower hammering on paper, make nature bookmarks, create cards, turn the fabric into a mini wall hanging, or use the prints in a summer nature journal.
A beautiful summer nature craft
This flower hammering art activity is such a lovely way to celebrate the colours of summer.
It is simple, creative and full of natural surprises. Children can explore flowers, leaves, colour, pattern and texture while creating something beautiful from the world around them.
It is a perfect summer craft for kids, outdoor art activity, nature craft, garden activity or low-cost creative project for home or school.
Happy creating
I hope you enjoy trying this flower hammering art activity with your children.
Collect a few safe flowers, grab some fabric, protect your table and see what beautiful natural prints you can create.
Happy creating.
Love,
Kerry xxx


Comments